
A smart way to use Retrofit
Retrofit library is a type-safe REST client for Android and Java created by Square Open Source. With this library you can request the webservices of a REST api with POST, GET and more. This library is awesome and very useful, but you need a good architecture and a good practice to use it as best as possible.
You can add header to every request or to specific request, which is very useful with secured webservices. For deserialization, you can use a custom JSON parser or a GSON object for automatic parsing. In this article I will show you these two ways.
You can find an example on Github if you have any problem to understand how Retrofit is working.
Why do you have to use Retrofit ?
This part is the boring one. Often this is the part where you can read a big amount of theories and bechmarks on Retrofit, Volley, Asynctask… But that is not the purpose of this article. I want to show you how to use Retrofit in a smart way and not how to fell asleep quickly tonight ;) For those of you who were looking for an article about an alternative way to call a Rest API or why it’s forbidden to use Asynctask in your project, I advise you to read these articles, which are quite long but very interesting : This article about Retrofit and Volley and this article is about Asynctask. Now that you have read or skipped this part we can go further and see How to use Retrofit.
How to use it ?
Obviously to use Retrofit you need this library in your dependencies, if the version mentioned below is not available or if you want the last version you can search Retrofit on Gradle, Please. You also need a converter used for JSON format : Gson. Parceler is used for serialization and deserialization of objects.
1 2 3 4 5 | |
Next, you have to synchronize your gradle files to fetch the library. Now you can start to use and structure your project to handle Retrofit in a smart way.
What do you need ?
There is a minimum amount of files to write to request a Rest Api, you need at least one interface to write your query, a model to retrieve the api response and a restclient to make your calls.
POJOs
First, you need models to retrieve data from JSON returned by the server. You have to create POJOs, the fields name have to be the same as those in the JSON but you can have different names if you use @SerializedName annotation to specify the name of the field in the JSON. There is Serializable and Parcelable for serialization and deserialization of object. The problem with Serializable is that reflection is used and it is a slow process.Parcelable that is faster, but you have to write a significant amount of boilerplate code. You can use Parceler that is a code generation library that generates the Android Parcelable boilerplate source code.
1 2 3 4 5 6 7 8 9 10 11 | |
Services
You have to create an interface called Service here to manage your url calls. In this interface you have to specify the type of the request like POST, GET, PUT, etc.. and the uri because in Retrofit you have to set a base url (common url for all requests) and each method in your interface specifies the end of your url with your arguments. Best practice: begin all your endpoint by a / like this way you know that all your request begin by a / and your base url have always to finish without /. Some of you will need to add some headers to their requests. You can do it in two ways: with the @Header annotation, above your request or in your parameters if you want to use a dynamic header, and programmatically. The second method is explained in the bonus part. The second best practice: create an interface for each type of request (for example one for all user requests like signin, signout, getProfile and another for content, etc…). In this article I will show you only Get and Post requests, because they are commonly used. The snippet below shows you a dummy service to point its structure.
1 2 3 4 5 6 7 | |
Now that you know how to create a dummy service let’s talk about one or two request types used in Retrofit.
Parameters
When you make a call to a webservice you want to send some parameters, this can be done in several ways. If the parameter is part of the URI, use a replacement system with @Path annotation. You can also add some query parameters with @Query. Other annotations exist but I will not explain them here, I will let you search a little bit if you need more specific parameters on Retrofit website.
1 2 3 4 5 6 7 | |
Get
In your interface if you add @GET(“your uri”), the method below will call the server with the concatenation of the endpoint and uri in Get. This is as simple as you see it.
1 2 3 4 5 6 | |
Post
Post requests work in the same way as Get requests but FormUrlEncoded can only be specified on HTTP methods with request body like Post. I advise you to add @FormUrlEncoded above to be sure that your parameters will be right encoded.
1 2 3 4 5 6 7 | |
Sync. vs Async.
The methods in your interface return a DummyContent this means that your request is synchronized and your execution will block until the request finish. If you want to create an asynchronized request you have to add a Callback to your methods and return void.
1 2 3 4 5 6 | |
Now your request will be asynchronized and you have to add a callback to each of your request to handle success and error response.
RestClient
Create a class called RestClient.java, here you will have to create your restclient object with your services, your gson object to deserialize responses and a restAdapter. You can use a standard Gson object or you can setDateFormat, the pattern will be used to parse all your date field, with this you can have in your POJOs a Date object and Gson will parse all strings that match this pattern and return a Date Object that is very easy to use instead of a string that you have to parse yourself. You have to change this pattern if it doesn’t match timestamp or date format. With the LogLevel set to Full you can see a lot of information about your request like the size, the time spent, the response code etc… Then the restAdapter is used to create our services.
1 2 3 4 5 6 7 8 9 10 11 12 13 14 15 16 17 18 19 20 21 22 23 24 25 | |
A good packages architecture
When you learn Android development, you have to create packages, which is quite boring and you should better write because if you have one or two files you don’t have to create packages. But if you read this article, you might have a good project with several files and it’s very important to create packages in order to organize your project. Below there is a screenshot of a package architecture that I use every day. You can use it or not but I strongly advise you to use this one or another one similar.
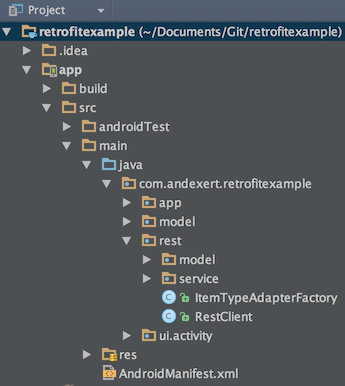
You can see that all UI files are in the same package and they are split in views, fragments, and activity packages. But here are the rest and the app package which are the most important packages.
Bonus
All the code above is made for a basic usage, but you can have a more efficient restclient in a few lines. In this part I will show you how to customize a little bit your app to have a powerful restclient.
Header
You have seen above that you can add headers with annotation but you can do it programmatically. You have to intercept each request and add a header. This approach is useful if you have to be authenticated to send a request. You just have to check if a user session is opened and add in this case your credentials to the header. So create a file called SessionRequestInterceptor.java and your class has to implement RequestInterceptor and then you have to implement the intercept method.
1 2 3 4 5 6 7 8 9 | |
Next, you have to add it to the RestAdapter of your RestClient.
1 2 3 4 5 6 7 8 9 10 11 12 13 14 15 16 17 18 19 20 21 22 23 24 25 26 | |
Decapsulate JSON webservices
Webservices can return simple JSON file but also very complex files. If the JSON is encapsulated you don’t want to create an object for the entire JSON but only for the content. We will take the below JSON as example of a success call to an API.
1 2 3 4 5 6 7 8 9 | |
So you have to create ItemTypeAdapterFactory class that implements TypeAdapterFactory and create the read method.
1 2 3 4 5 6 7 8 9 10 11 12 13 14 15 16 17 18 19 20 21 22 23 24 25 26 27 28 29 | |
Next, you have to add it to the Gson object in your RestClient.
1 2 3 4 5 6 7 8 9 10 11 12 13 14 15 16 17 18 19 20 21 22 23 24 25 26 27 | |
Errors handling
Retrofit allow only response code of 20* if your server return a code 40* or anything else the Retrofit callback will go to failure and you don’t easily have access to the body of the request. So you have to manage error if you want to get data easily when failure. First, create a POJO that handle the entire JSON response for the above example.
1 2 3 4 5 6 7 8 9 10 11 12 13 14 15 16 | |
Next, you have to create a custom Callback to properly handle errors messages. Create a RestCallback class that extends Callback.
1 2 3 4 5 6 7 8 9 10 11 12 13 14 15 16 17 | |
Next, you have to replace all your calls in the services by this new Retrofit Callback.
Conclusion
Now you have a great, sexy, powerful application with Retrofit. TA-DAH :D !